
Observing children as they play, learn, and socialize with others is an integral part of every early educator’s daily routine. According to the California Preschool Program Guidelines, when early caregivers and preschool teachers “regularly observe and document brief, subtle moments of children’s learning through play, those records help parents and others understand how useful and important play is in helping children to learn and grow” (p. 32-33). In this chapter, we will examine the various observation methods, tools and techniques that can be used to gather information about the children in your care. Although teachers may favor one method over the other, it is recommended that teachers utilize several methods, tools and techniques so that they can gather a well- rounded perspective of each child. To truly understand the “whole child” it is important to realize that observation and documentation is an ongoing process that begins with gathering “baseline data.”
In order to truly measure the learning, growth, and development of a child over time, there needs to be a point of reference, or a starting point. Baseline data provides a starting point. As recommended by the California Department of Education, in the Desired Results Developmental Profile (DRDP), to establish a baseline, children should be observed “within 60 calendar days of enrollment and [formally assessed] every 6 months thereafter” (DRDP, 2015, p. ii). More specifically, any time a child starts your program, or any time you introduce a new concept, topic or theme, it would be beneficial to gather baseline data. With each observation the goal is to track – What the child can do. Then, as we review each observation, we further consider what the child has the potential to do. Knowing specific details about how the child responds to the activities we have planned, and how the child is interacting with their peers, allows intentional teachers to make informed decisions that are in the best interest of the child. Baseline data allows us to create individualized activities and enriched learning opportunities and set up engaging environments where each child can feel empowered, challenged and well cared for.
Here is an example:
Aaron is 3.5 years old and this is his first time in preschool. To see whether Aaron can write his name, you would set out writing materials (markers or crayons, paper and possibly stencils), and you would observe Aaron at the writing center. To gather baseline data, you could use an Anecdotal Note to record how Aaron holds the markers – is he using the palmer grasp or the pincher grasp? Is he using his right or left hand? You would also want to note what Aaron created – did he write his name, draw a picture or scribble? If Aaron scribbled, he might not be ready to use lined paper to write his name or to journal a story. Rather than planning an activity that would require Aaron to write between the lines, it may be more beneficial to plan activities that would help him further develop his fine motor skills. Perhaps you would set out activities that would build his pincher grasp like play dough or stringing beads. Once you observe Aaron’s progression and his “signs of readiness”, then you would reintroduce writing between the lines.
Many of the same tools and techniques you use to gather baseline data, you will continue to use to support the whole child. This includes screening, planning curriculum, and assessing development. Every observation you complete provides valuable information that you can use to be more intentional and more responsive. When we observe the children in our care, we can learn about their:
Whether you are doing a planned observation, or you decide to do a spontaneous observation, you will need some essentials. An intentional teacher is a prepared teacher, and here are a few things you will need:
No single observation can give you all the information you will need about a child’s development. In order to truly understand a child’s unique attributes, preferences, personality and strengths, you must observe them consistently, using several documentation tools and techniques. Each observation method has strengths and limitations. In this section, we will review some of the more commonly used techniques and tools that teachers use to gather objective observation evidence: Running Record; Checklists; Frequency Count; Anecdotal Record; Work Sample; Learning Story; and Technology.
Figure 9.1 Notetaking is one of the oldest forms of recording observations [1]
One of the oldest observation methods used in early child education is the Running Record. Running Records are considered by some as an “informal method” of observation as compared to Narrative Description or Specimen Records which are considered to be a more “formal method” of collecting data. The primary difference between the two methods is that with a Running Record, evidence is gathered in a more spontaneous (informal) manner as it occurs, whereas with a Narrative Description a (formal) plan would be arranged in advance, prior to the observation. More specifically, you would schedule a day, time and setting, you would select a specific child or group of children, and you would decide on the purpose, reason or focus of your observation (e.g. cognitive skills, social interactions, play patterns). Both methods provide rich, detailed evidence and both methods provide written accounts of everything you see and hear a child doing during a specific timeframe (Bentzen, 2009).
For the purpose of this text, we will use the term Running Record and recommend that you, as an intentional teacher, conduct Running Records (whether spontaneous or planned, informal or formal) as part of your regular or routine observations. The primary goal for using a Running Record is to “obtain a detailed, objective account of behavior without inference, interpretations, or evaluations” (Bentzen, 2009, p.112). You will know you have gathered good evidence when you can close your eyes and you can “see” the images in your mind as they are described in your Running Record (Bentzen, 2009).
All you need is time, paper and a pen to gather your observation evidence. The goal with a running record is to write down everything you see and hear – exactly as it occurs, without adding any comments or attaching any opinions. As the saying goes, “just the facts, ma’am!” With the Running Record format, not only will you highlight children’s behaviors, you will record the “setting, situation and sequence” in which the behavior occurred. Be as descriptive as possible and yet be as concise as possible. Children move quickly, so you must write quickly. When conducting a running record, you need to be out of ratio. You are to step back and observe from a distance. Do not interfere with the child’s natural play, do not ask questions and do not run after them. Be as invisible as possible.
As you collect rich, detailed data throughout the school year, you will begin to recognize patterns of development, and you will see each child’s unique attributes, personalities, and abilities as they emerge. Be sure to date all your running records; having 12-24 children in your classroom can add up to a lot of running records. You will need to store your running records safely in a portfolio or file folder. When it comes time to assess a child’s development, you will be able to look back and review all the evidence you have collected and to monitor the child’s progress over time.
Note: A Running Record is an ideal observation method for “students”. Teachers may not always have the time or staff coverage to conduct a Running Record.
Table 9.1: Running Record
Advantages
Disadvantages
Example 1:
Running Record: On 7/2/2019, Jorge played in the sandbox for 20 minutes.
What did you “see” with this example? What was the setting, situation and sequence of events?
What did you learn about Jorge?
Was the evidence objective? Was the evidence descriptive?
Example 2:
Running Record: 7/2/2019. Time: 10:10am
During outside play and exploration, the following activities were available: bikes, sandbox, sensory table with goop, hula hoops, balls and a reading area with a basket of books. Jorge played in the sandbox for 20 minutes. With his left hand, Jorge dug a hole using a shovel. Jorge asked Julissa if he could have the dinosaur, “When you are finished, can I have the dinosaur for my cave?” Julissa handed Jorge the dinosaur and said, “Can I see?” Jorge nodded his head up and down.
At 10:30am, the teacher announced that it was time to clean up. Jorge stood up, dropped his shovel, ran over to the door and got in line. While in line, Jorge waved his hands and said “Come on Max. Come on. Here. Come here.” Max ran over and stood next to Jorge in line.
What did you “see” with this example? What was the setting, situation, and sequence of events?
What did you learn about Jorge?
Was the evidence objective? Was the evidence descriptive? [2]
Running Record Template #1
Date:
Start Time:
End Time:
Setting:
Activity Area:
Who did you observe:
Running Record
Running Record Template #2
Date:
Start Time:
End Time:
Setting:
Activity Area:
Who did you observe:
Running Record
Interpretation

Figure 9.2 When is a frequency count used? Whenever you need to tally and record how many times a behavior is occurring. [3]
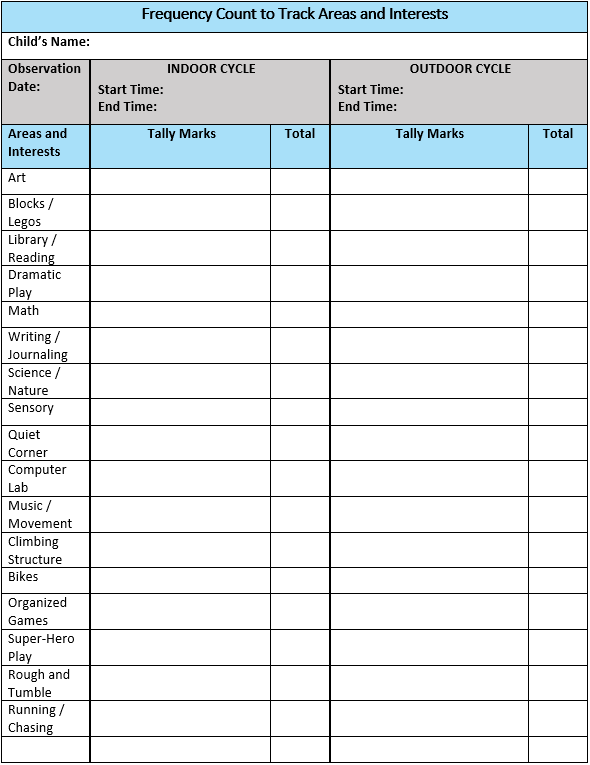
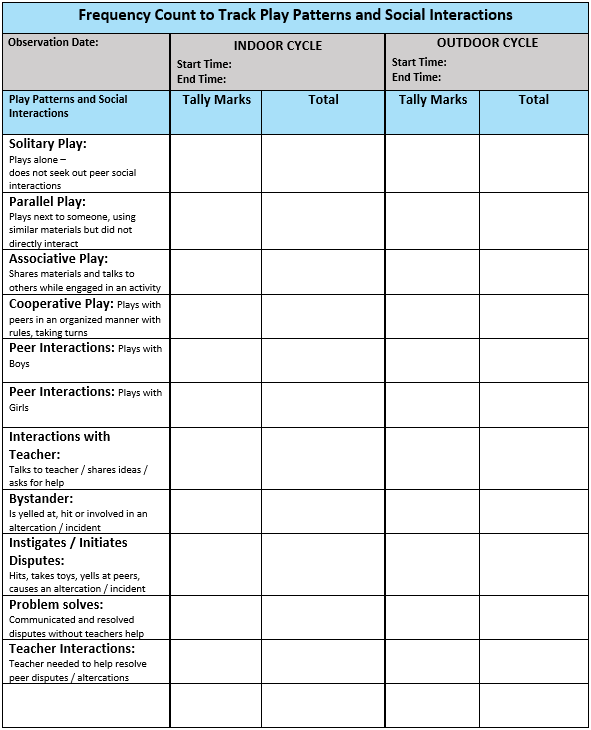
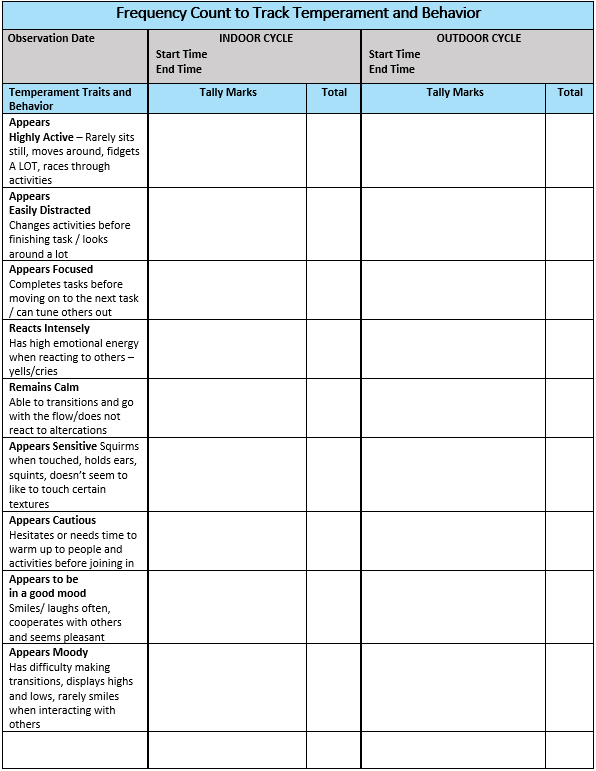
A Frequency Count is an informal observation method that is used to gather information about a child’s interests, social interactions, play patterns, and temperamental traits. As the teacher observes the children at play, a tally mark is made every time the noted behavior or action occurs within a set timeframe. Frequency Counts are also used to track undesirable or challenging behaviors, as well as ideal or positive behaviors.
To create a Frequency Count, you must first decide on what social interactions, behaviors, interest areas, or types of play you want to monitor. You may decide to track your child during one focused activity or timeframe, or you may map out what a typical day might look like for your child and track all the interactions and experiences they engage in throughout the day. Either way, as you observe your child, you will make a tally mark every time they play in a specified area or display one of the action items as listed on your Frequency Count.
Here are some examples of how you might use a Frequency Count to gather data:
After you have collected all the data for that timeframe, count the tally marks. What can you interpret from this data? What areas or action items received a high number of tally marks? What areas or action items received a low number of tally marks? Do you see any patterns? As you consider those questions, reflect on a plan of action that you might use to further support that child’s development.
Table 9.2: Advantages and Disadvantages of Frequency Data
Advantages
Disadvantages
Checklists are an efficient and practical way to collect information about a child’s development. Checklists are based on “developmental norms” as determined by developmental theorists. With each age range, there are certain expectations and skills that a child should be able to achieve. Checklists are designed to track a child’s competencies in all the developmental domains including physical, cognitive, language, social and emotional. With a checklist, teachers can easily see what a child can do, as well as note what areas of development need further support. Teachers can create their own checklists based on certain skill sets, or they can download a formal developmental milestone checklist from a reputable source to look at a child’s full range of development. Checklists can be used to track a large group of children or an individual child.
Whether you design your own checklist or download one, use it regularly to collect data. The checklist can be utilized in two ways:
*Note: It is vital that you note the dates that you observed the skills being mastered. A check mark alone will limit the reliability and validity
Schedule a day and time to regularly review your observation data. Data collected from other observations (mastered milestones and developing skill sets) can be added to the checklist so you can clearly see a child’s progress over time. You may use colored pens to track all the different dates that milestones were achieved. As you review the checklist, what can you interpret from this data? Does the child demonstrate strengths in any of the developmental domains or areas of learning? Which milestones and skills need further support? As you consider those questions, reflect on a plan of action that you might use to further support that child’s development. How can you provide opportunities for the child to gain more practice? What adjustments need to be made to make the activity more challenging? What extensions can be added to continue the learning pattern? [4]
Table 9.3: Advantages and Disadvantages of Checklists
Advantages
Disadvantages
Checklist for Physical Milestone
Perceptual Movement
Skills
Can Do
Needs Further Support
Date and Evidence
Moves in a zig-zag pattern – able to change directions with ease
Plays follow the leaders and mirrors others movements
Moves body to music cues
Speeds up and slows down while running or riding bike
Gross Motor Movement
Skills
Can Do
Needs Further Support
Date and Evidence
Completes tasks on an obstacle course
Changes directions and stops quickly while running
Pumps legs on a swing
Runs and uses arm and legs in opposition
Walks up and down stairs with one foot on each stair step
Hops on one foot
Catches and throws (bean bags and balls)
Pedals a 3-wheeled bike (tricycle)
Bounces a ball several times
Walks along a balance beam
Jumps up and down, jumps forward using arms
Fine Motor Movement
Skills
Can Do
Needs Further Support
Date and Evidence
Cuts with scissors
Uses writing utensils (markers, crayons, pencils) to scribble
Prints letters, numbers
Uses stamps and stamp pad